
What is Forge
Forge Minecraft is server that runs the Forge modding platform on top of the standard Minecraft server software. Forge allows players to use and create mods, which are modifications to the game’s code that can alter or enhance various aspects of gameplay.
Our Forge Auto Install takes the transferring and managing of mods on your server and automates it using some key info. This is recommended for spinning up complex or large modpacks. See the instructions below.
Some Forge mods may require the use of a custom launcher. See our “Extra Resources” page for more info on Minecraft Launchers
Quick Setup instructions
- Create a new server and then click manage or select the server from panel.questcrafts.com
- Once the Pre-installation completes, go to the Startup tab to select your Java version and enter your ModPack Project ID. (curseforge.com/minecraft/modpacks)
- Go to console.curseforge.com to get the API key.
- After filling out the boxes, go to the Settings tab and click Reinstall Server
- Go back to the console Tab and click Start to begin the installation.
- Once the Install is complete, please restart the server to assure all updates are installed.
- Your server is now ready to play. Use use the address indicated in the top right of the screen.
What do I do first after setting up my server
Please visit our this guide for some of the first things to do with your server. This is where you can find info on how to setup a whitelist so only your friends can join or how to install your first mod. Or general info on how to navigate the dashboard panel.
If you need further support please open a Support Ticket
Visit the CurseForge official site: curseforge.com/minecraft for mods and support documentation
Step by Step Instructions
Provisioning the server
- From the host site under servers, select “Create Server”.
- Choose an appropriate name that will let you distinguish this server from others.
- In the “Software / Games” dropdown, select Minecraft and the Select Forge Auto Install under “Specification”
- Select “Create Server” on the desired plan. – Note credits will be deducted once you press create server with the amount equal to 1 hours worth of the total price. See FAQs for more info
- You will be taken back to the servers page. Please select “Manage” under your newly created Mohist server.
- You will be redirected to your server’s Dashboard. You will receive an error message stating, ERROR: You must specify a PROJECT_ID environment variable! – This is normal as we have not told the server which modpack to install. You may also be greeted with only the message: “container@pterodactyl~ Server marked as offline…”

- If you attempt to start the server at this point, you will receive an error:

Finding and installing your modpack
- First we need to select a modpack. Visit curseforge.com/minecraft/modpacks
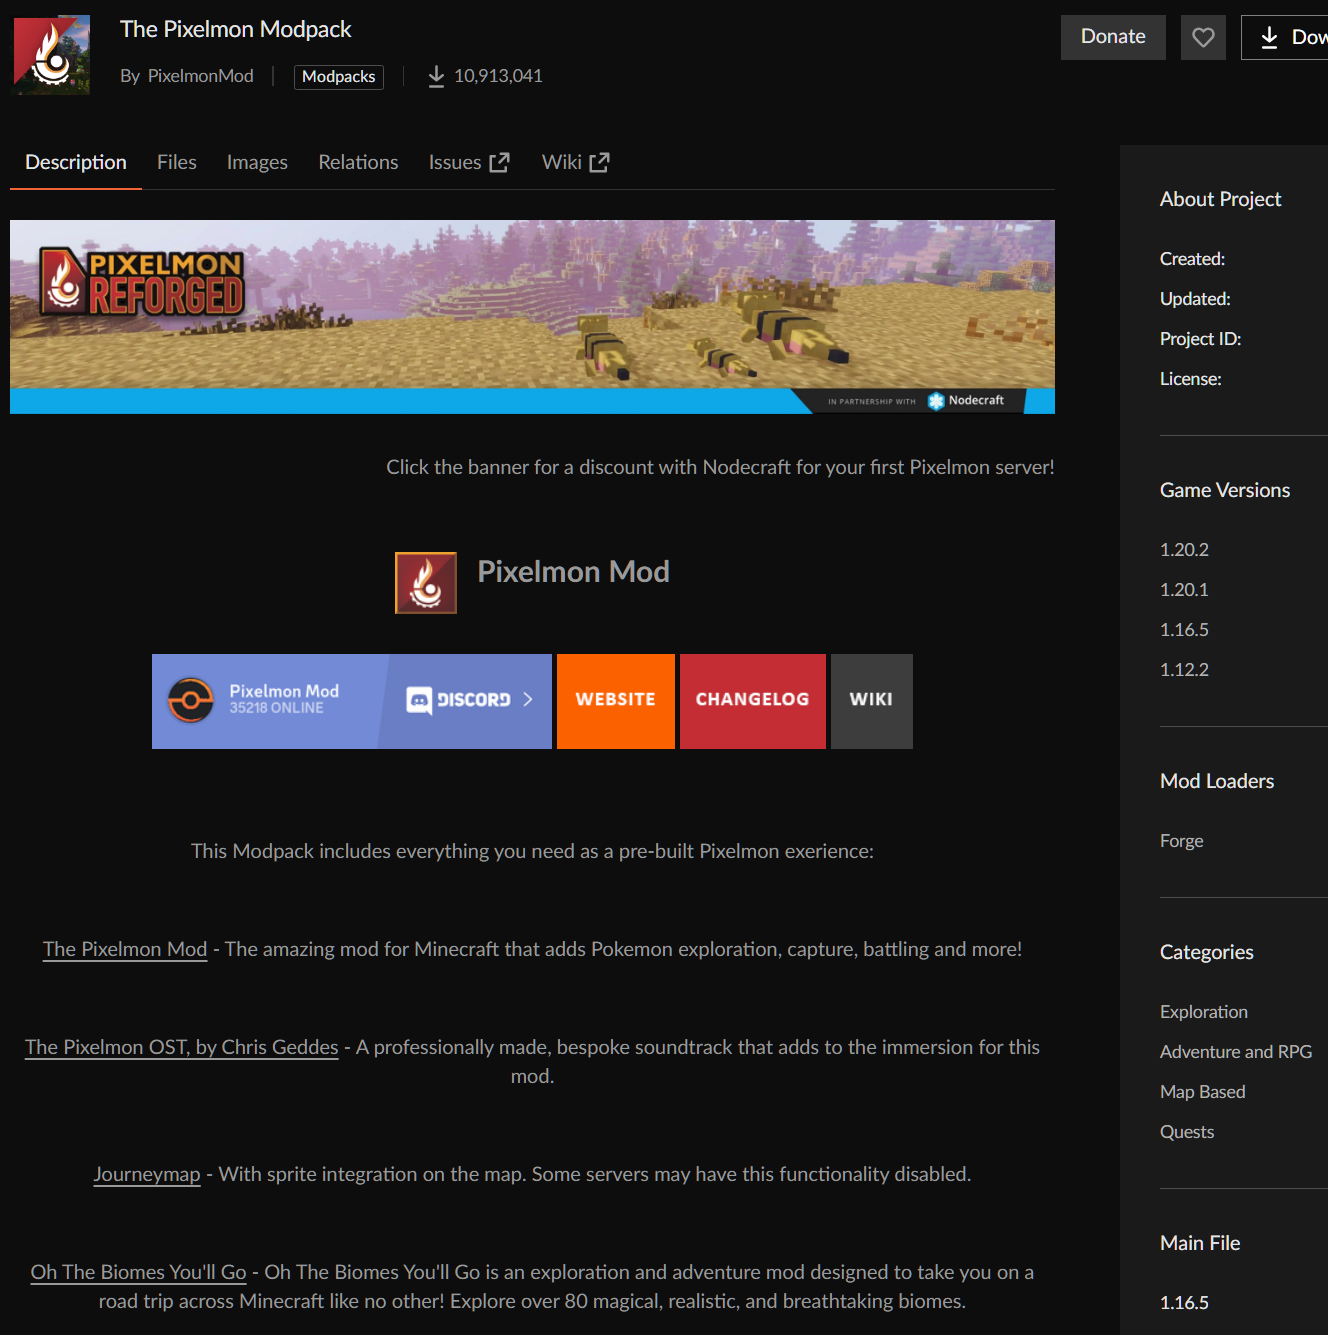
- Find the modpack you wish to install click on it. For this example, we will use The Pixelmon Modpack
- Once you are on the modpack page, please note the info on the right hand side.
- Verify under Mod Loaders that Forge is listed
- Take Note of the Main File version. For this example the Latest Release version is 1.16.5
- Copy the Project ID. This modpack’s ID is 389615
- Finally, scroll down to the bottom and make sure there is a Server Pack listed.
- See below
- Now that we have the required info, go back to your Dashboard. You can find the dashboard by visiting panel.questcrafts.com and clicking on your server.
- Once at the Dashboard, click on the “Startup” Tab across the top of the screen.
- Select the Java version in the DOCKER IMAGE box using the table below.
- Some Modpacks will have multiple Game versions available
- For our example, the latest release version is 1.16.5, but we would like to run game version 1.12.x so we will pick docker image Java 11
- Note: Java 16 can also work for 1.16.5. if you receive an error when starting the server later in the process, try changing from 11 to 16 or from 16 to 11 and restarting the server.
| Server Version | Java Version |
|---|---|
| Minecraft version 1.8 to 1.11 | Java 8 |
| Minecraft version 1.12 to 1.16.5 | Java 11 |
| Minecraft version 1.16.5 | Java 16 |
| Minecraft version 1.17.1 to Current | Java 17 |
- Next paste the Modpack ID in the MODPACK PROJECT ID
- For our example we will paste in the number: 389615
- If you wish to install an older version of the modpack, or a beta version, you will need to edit the MODPACK FILE ID
- The File ID is the trailing digits on the end of the modpack file URL
- By default, this is set to “latest” for the most current version of the pack
- To select an older pack, click on the serverpack you wish to use.
- For example if we wished to have a Game version 1.12 instead of the latest release running on 1.16, we could set the File ID. Clicking on Server Mod Pack 8.4.3 we notice the the end of the URL is 4348486. Entering that value into the MODPACK FILE ID box will give us this specific version.

- For example if we wished to have a Game version 1.12 instead of the latest release running on 1.16, we could set the File ID. Clicking on Server Mod Pack 8.4.3 we notice the the end of the URL is 4348486. Entering that value into the MODPACK FILE ID box will give us this specific version.
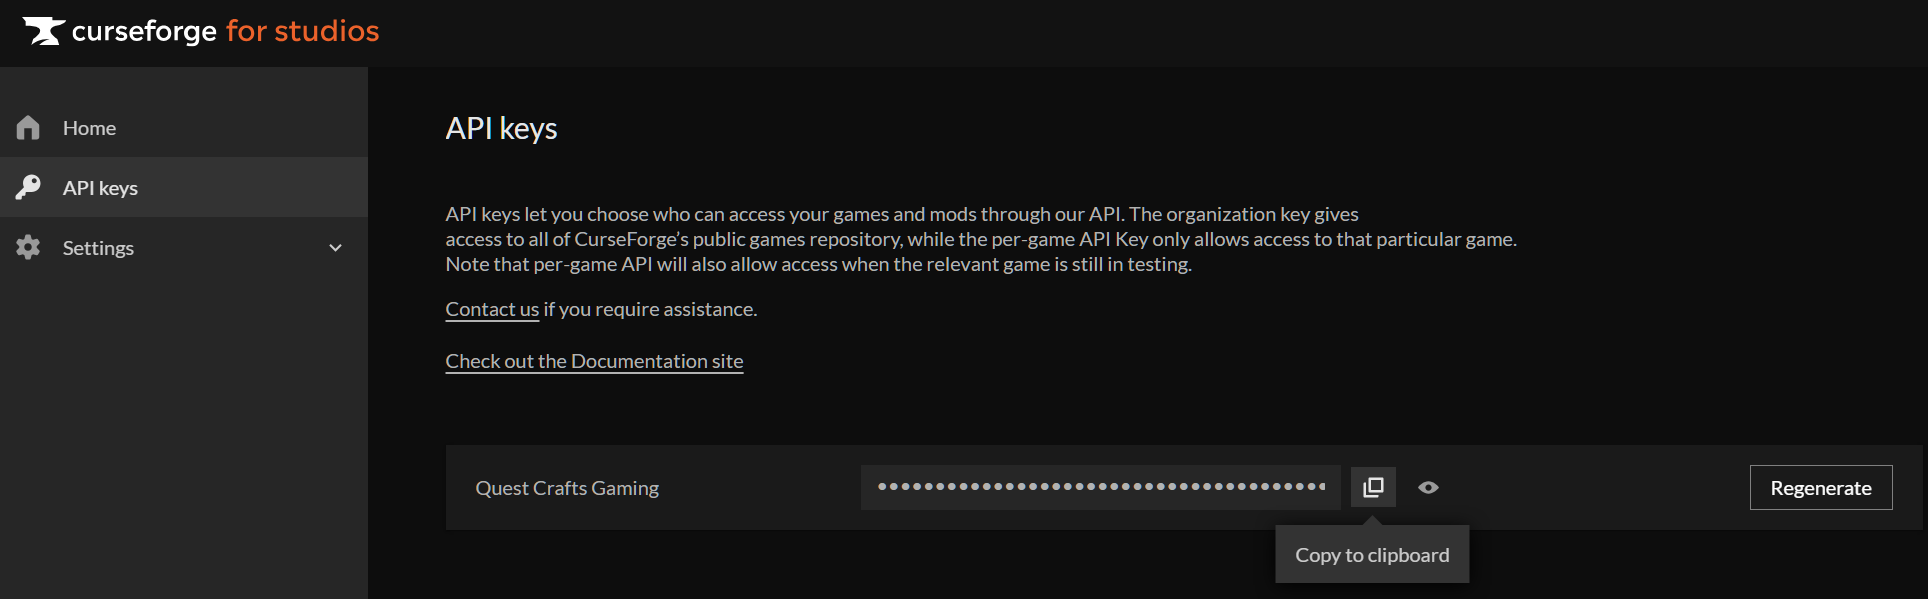
- Lastly we will need to enter a CurseForge API Key
- The Easiest way to get a key is to Visit console.curseforge.com (you will need a Google account)
- Click small Sign Up link and then click the “Sign up with Google” button.
- Once you have created an account and logged in, Select “API keys” from the left hand bar
- Now copy the API code to your clipboard
- See below
- Once you have filled out all four boxes, you are ready to install the server.
See below for an example of the completed page.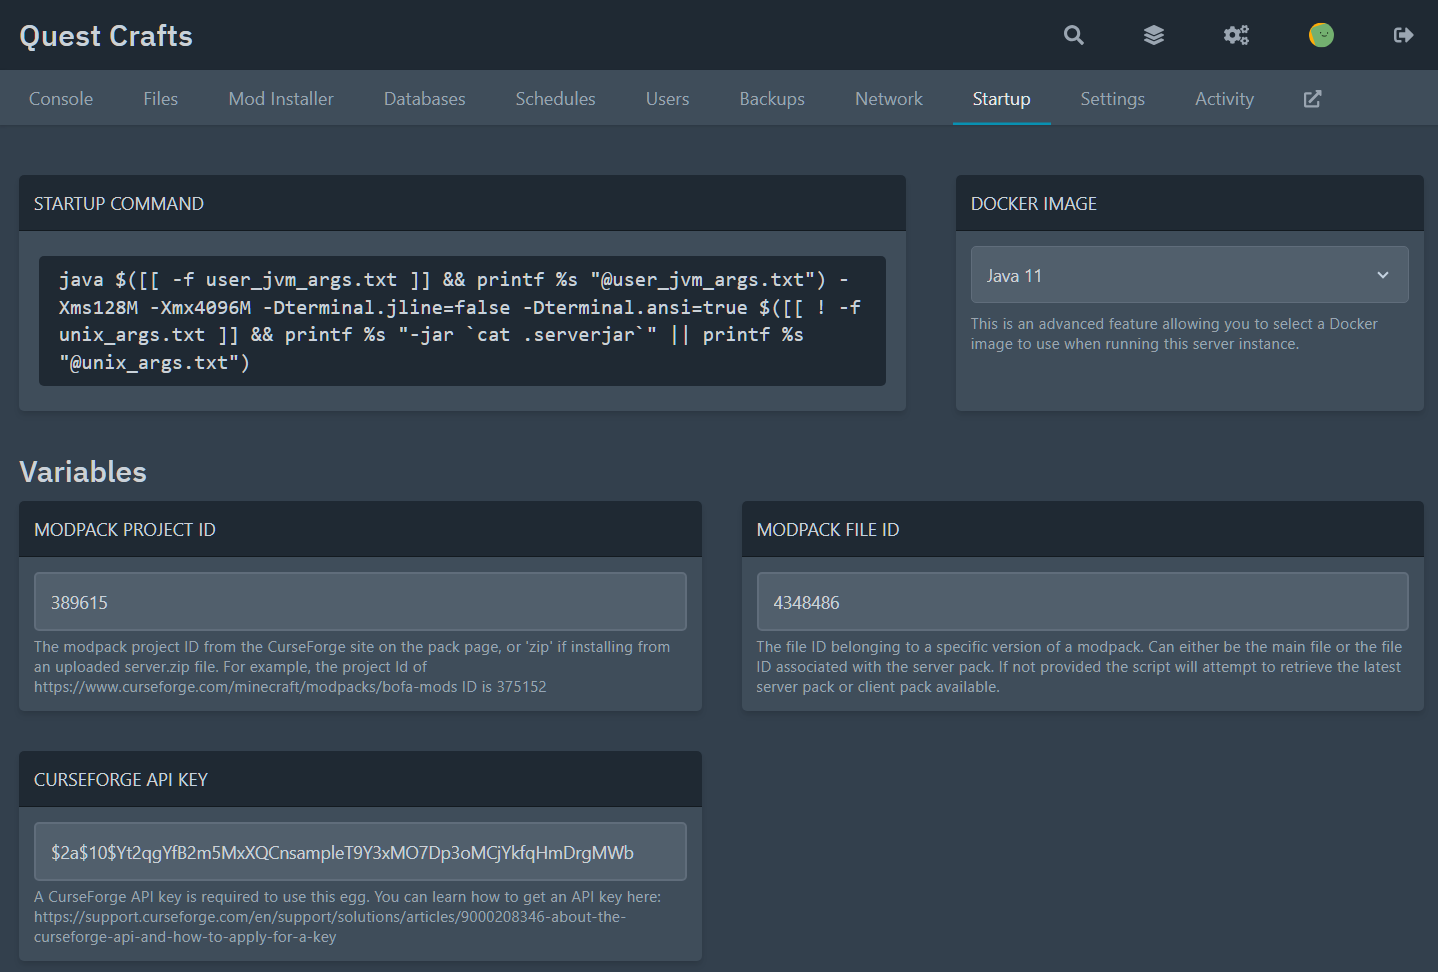
- In the above example you can see
- Docker image – Chose Java 11 because this mod runs on game version 1.12.X
- Modpack Project ID – The Pixelmon Modpack is 389615
- Modpack File ID – We want to run game version 1.12 instead of 1.16 so we specified
- Curseforge API key – Randomized shown as an example
Installing the Server
- Click on the “Settings” tab across the top of the screen.
- In the lower right box REINSTALL SERVER, click the “Reinstall Server” text. It will highlight RED as you hover over it.
- In the popup window, confirm you wish to reinstall by clicking the RED “Yes, reinstall server” button.
(This process could take 1-5 minutes on average depending on the size of the modpack chosen.) - Once the Running Installer window disappears, Click on the “Console” tab across the top of the screen.
- You are ready to press the blue “Start” button (if you receive an error, try changing your Java version in the “Startup” tab)
- When the world building is complete and you see “Server marked as running…” — If you had walked away or closed the page, you may see “Done (NUMBERs)! For help, type “help””
- It is recommended that we stop and start the server once more to verify all updates have been downloaded. Press the Red “Stop” button in the top right corner.
- Wait for the server to save and confirm you see, “container@pterodactyl~ Server marked as offline…”
- Now press the blue “Start” button and let the server start up. Confirm you see “Server marked as running…” or “Done (NUMBERs)! For help, type “help”” in the console.
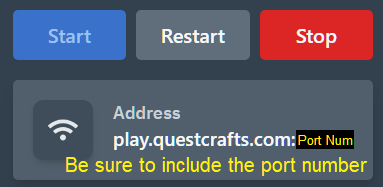
- Your server is now ready to join. Use the address located below the Start / Restart / Stop buttons to connect to the server. Clicking the address will copy it to your clipboard. — Be sure to include the port number. This number distinguishes your server from other servers.
Remember you will need to install the mod on the client (player’s) PC too. See our Minecraft Launchers section for alternative launchers that can manage mods.