What is Spigot
Spigot, a modified Minecraft server derived from CraftBukkit, offers enhanced performance, configurable internal server values, and additional features while ensuring compatibility with existing plugins and Vanilla Minecraft mechanics. Users can adjust parameters like growth rates, hunger speed, and damage thresholds, and track in-game locations. With a comprehensive moderation toolkit, Spigot allows actions such as kicking, banning, killing, teleporting, and item distribution, as well as the ability to spawn entities, items, and terraform the world through coordinate-based commands. Boasting over 20,000 plugins,
Spigot enables extensive customization, allowing players to become wizards, implement inventory sorting, introduce NPC merchants to villages, and create personalized Realms with interconnected PVP, mini-games, survival, and creative worlds using BungeeCord.
Quick Setup instructions
- Create a new server and then click manage or select the server from panel.questcrafts.com
- Once the Pre-installation completes, click Start to begin the installation.
- Accept the EULA and let install finish.
- Once the Install is complete, please restart the server to assure all updates are installed.
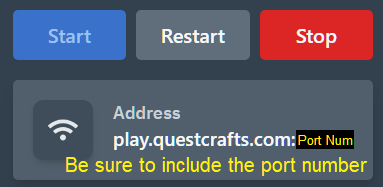
- Your server is now ready to play. Use use the address indicated in the top right of the screen.
What do I do first after setting up my server
Please visit our this guide for some of the first things to do with your server. This is where you can find info on how to setup a whitelist so only your friends can join or how to install your first mod. Or general info on how to navigate the dashboard panel.
If you need further support please open a Support Ticket
For Spigot support, plugins, mods and resources, visit the official site: spigotmc.org
Step by Step Instructions
- From the host site under servers, select “Create Server”.
- Choose an appropriate name that will let you distinguish this server from others.
- In the “Software / Games” dropdown, select Minecraft and the Select Spigot under “Specification”
- Select “Create Server” on the desired plan.
- Note credits will be deducted once you press create server with the amount equal to 1 hours worth of the total price. See FAQs for more info
- You will be taken back to the servers page. Please select “Manage” under your newly created Spigot server.
- You will be redirected to your server’s Dashboard. Pre-installation will have already started. Please wait until Server installation is finished before moving on. This usually takes around 3 minutes to complete from the time you pressed “Create Server”.
- You will know when this is done when you see the text, “Success! Everything completed successfully.”
- If you have closed or refreshed the page, you may instead see, “container@pterodactyl~ Server marked as offline…” Both are indications that the server has installed correctly.
- See examples below


- Now that the pre-installation is complete, press “Start” on the top right to finalize the installation and load all the resources.
- You may receive an “Unsupported Java Version” pop up. This is normal. Some server modifications required different versions of Java.
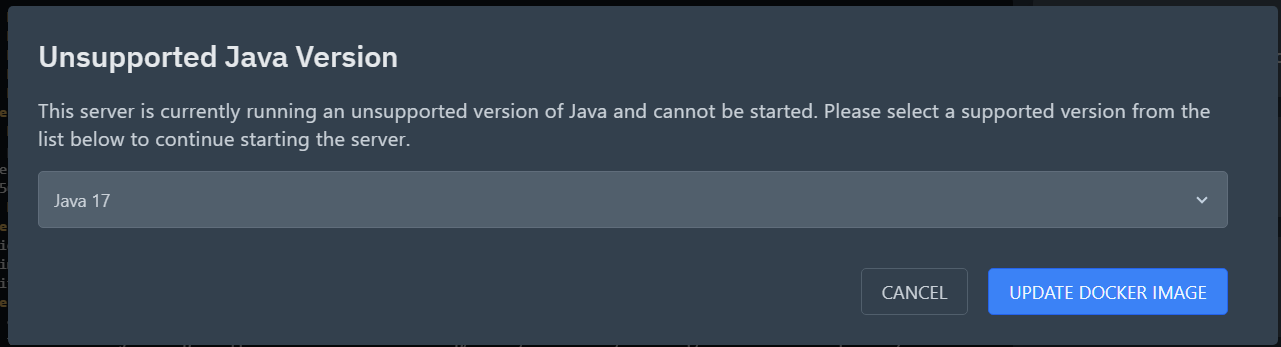
- Select your desired version and click, “Update Docker Image”. If you are unsure which version you need, select Java 17 or reference the table below. This can always be changed later after the server installation has completed.
| Server Version | Java Version |
|---|---|
| Spigot 1.16 and below / BungeeCord | Java 11 |
| Spigot 1.17 and above | Java 16 |
| Spigot 1.18 and above | Java 17 |
- Next, the Minecraft EULA will pop up in a window. This must be accepted before any further installation is allowed to take place.

- After you have accepted the EULA, the server will begin building assets and preparing the world. This process can take a couple minutes.
- When the world building is complete and you see “Server marked as running…”.
- If you have closed or refreshed the page, you may see, “Done (NUMBERs)! For help, type “help””
- It is recommended that we stop and start the server once more to verify all updates have been downloaded. Press the Red “Stop” button in the top right corner.
- Wait for the server to save and confirm you see, “container@pterodactyl~ Server marked as offline…”
- Now press the blue “Start” button and let the server start up. Confirm you see “Server marked as running…” or “Done (NUMBERs)! For help, type “help” in the console.
- Your server is now ready to join. Use the address located below the Start / Restart / Stop buttons to connect to the server. Clicking the address will copy it to your clipboard. — Be sure to include the port number. This number distinguishes your server from other servers.